
Mealworm Life Cycle: What to Expect at Every Stage
Understanding the mealworm life cycle takes the guesswork out of farming them.
Once you know what you're looking at and why, most of the things that look like problems turn out to be completely normal — and the actual problems become much easier to catch early.
New to mealworm farming? Start with How to Raise Mealworms at Home before diving into the life cycle.
The Four Stages
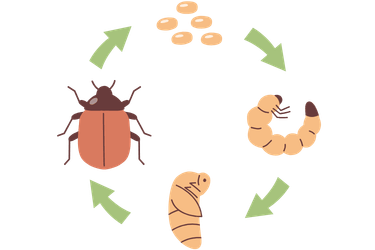
Mealworms go through complete metamorphosis: egg, larva, pupa, and beetle. Each stage has its own needs and its own timeline. Conditions in your bin — especially temperature and humidity — affect how quickly things move at every stage.
Eggs are tiny, white, and nearly impossible to spot with the naked eye.
The beetles lay them directly in the substrate, which is one reason we keep egg-rich bran in a dedicated tray rather than disturbing it.
Incubation takes roughly one to four weeks, depending on temperature. Warmer bins hatch faster. Cooler bins slow everything down.
Eggs
The first thing to know about mealworm larvae is that you won't see them for a while.
Hatchlings are nearly microscopic and stay that way through the early instars. If you're waiting to spot movement in your egg bin and seeing nothing, that's normal.
The best way to check whether eggs have hatched without disturbing the bin is to make a small mound of the substrate and watch it for a minute. If larvae are present and active, you'll see the mound slowly shift and trickle down the sides as they move through it. It's subtle, but unmistakable once you know what to look for.
Humidity matters more than most beginners realize. Research found that larvae raised at higher humidity were nearly twice as heavy and significantly longer than those raised in dry conditions over a 12-week study (Lindqvist, AGRIS/FAO, 2021).
Studies consistently show that relative humidity above 70% produces the best results for larval development, survival, and growth (PMC, 2022).
We notice this most in winter. When the furnace kicks on and the indoor air dries out, our bins slow down noticeably. A small humidifier near your setup is a simple fix — it makes a real difference.
When purchasing mealworms, they're typically sold by size: smalls average around ½ inch, mediums run 5/8 to ¾ inch, and larges generally fall between ¾ and 1 inch.
Time to full size and final grow-out weight before pupating both depend heavily on temperature and feeding conditions.
A warm, well-fed bin produces large, heavy larvae ready to pupate in eight to ten weeks. A cooler or leaner bin may take five to six months to reach the same point. Both are normal — the worms will get there.
Larvae
Larvae don't grow continuously. They grow in stages called instars — periods of feeding and development separated by a molt, where the larva sheds its old exoskeleton and emerges in a new, larger one. Mealworms pass through roughly 9 to 20 instars before pupating, with most averaging 15 to 16 (Cotton, 1927; Feedipedia, INRAE).
After each molt, the larva emerges bright white. As its exoskeleton hardens over the next day or two it darkens back to golden brown — and that cycle repeats with every single shed. You'll often find a mix of pale and dark larvae in the same bin at any given time. That's healthy and normal.
A larva that stays pale far longer than expected after a molt, or that appears shriveled rather than plump, is likely underfed or too dry. Check your food and moisture source before assuming something more serious.
A larva that turns fully black and goes limp is a different matter. Black coloration in a dead or dying larva typically signals bacterial infection — either a pathogen that killed the worm directly, or bacteria that moved in rapidly after death from another cause. Research on Tenebrio molitor infections confirms that bacterial infection causes discoloration and blackening, and that saprotrophic bacteria can colonize a dead larva within hours (Eilenberg et al., Journal of Insects as Food and Feed, 2015). Remove any black larvae promptly to keep the rest of the bin healthy.
Instars: What the Shedding is About
The larva stops eating, curls into a comma shape, and goes still. It looks dead. It isn't. Leave it alone — pupae are fragile, and handling them too often or too roughly can cause deformities or death. We scoop them out into a separate pupae container as we spot them and let them sit undisturbed. The pupal stage typically lasts one to three weeks, depending on temperature.
A healthy pupa is cream to tan-colored and firm. A pupa that gradually darkens to brown and eventually turns black has died — this is a different situation from larval blackening. The most common cause is inadequate moisture stored during the larval stage. A larva that didn't receive enough vegetable matter before pupating simply doesn't have the reserves to complete the transformation. Keeping a consistent moisture source available to your larvae in the weeks before they pupate significantly reduces pupal losses.
Deformed beetles — missing legs, underdeveloped wings, or empty-looking abdomens — usually point to temperature being too low during pupation, or to the pupa being disturbed or chewed on by larvae before it fully hardened. Separating pupae as you find them protects them.
Pupae
Beetles emerge completely white and soft, then darken over the first 24 to 48 hours as their exoskeleton hardens. A freshly hatched white beetle is healthy and normal. Give it time.
A beetle that remains pale and soft beyond 48 hours, or that never fully hardens, didn't complete development properly — usually due to temperature being too low during pupation or nutritional gaps in the larval stage.
Give them structures. Paper towel tubes or toilet paper inserts dropped into the bin give beetles more surface area to roam, hide in, and travel across. It encourages natural movement and more active egg-laying. We call it a beetle gym. It costs nothing.
Keep them fed — consistently. An underfed beetle bin turns aggressive fast. Beetles that run out of food will chew on eggs, pupae, and each other. Keep bran available at all times and keep them hydrated.
We intentionally keep less substrate in the beetle bin than in our larval trays — we like to collect the egg-rich bran in small, consistent batches — but we are careful that it never fully runs out. Concentrated, frequently harvested substrate keeps incoming batches of larvae starting at a similar size, which makes them much easier to manage.
Stock them appropriately. A practical target for a home setup is roughly 3 adults per square inch of bin surface, or about 430 adults per square foot. Measure your container, do the math, and you'll have a reasonable starting point. Overcrowding reduces egg output and increases losses. Research on industrial operations confirms that density directly impacts both reproductive performance and adult mortality (Palumbo et al., Animal, 2024).
Label and rotate. We date our beetle bins when we set them up. After four to six weeks, egg production drops off significantly, and managing the bin becomes more time-consuming than it's worth.
At that point, we move the whole population out of the egg-rich substrate. An important thing to note: we do not release them into the chicken yard. Research confirms that adult T. molitor beetles produce benzoquinones as a chemical defense, a toxic compound that accumulates with age and is absent in the larvae. Benzoquinone can interfere with cellular respiration and has known carcinogenic effects (Choi et al., Animals, 2020).
Spent beetles go into a sealed container, then into the freezer. From there, they go into the compost.
Beetles

Looking for setup and feeding basics? Start with How to Raise Mealworms at Home. Curious about the bigger picture — who eats mealworms and why they're worth raising? Visit Why We Raise Mealworms.
We raise mealworms here on the farm. If you're local to Hickman County and want to skip the startup phase, we sell them in quantities from 25 to 1,000 when available. Wheat bran is available too — 1-pound bags standard, larger quantities on request. Reach out at info@restoringrootsranch.com.